We often need to take screenshots on our PC or laptop to capture images from videos or from a website. In this article, we will discuss two ways to take screenshots in python.
Take Screenshots Using the pyautogui Module in Python
We can use the pyautogui module to take screenshots in python. Along with the pyautogui module, we will also need OpenCV and numpy module to capture screenshots. You can install these modules using PIP as follows.
pip install pyautogui numpy opencv-pythonAfter installing the modules, you can use them in the program. The pyautogui module provides us with the screenshot() function with the help of which we can take a screenshot. The screenshot() function, when executed, returns a PIL(python image library) file in RGB format. First, we will convert the PIL file into a numpy array using the numpy.array() function.

After creating the numpy array, we will convert the RGB format of the image to BGR before storing it in storage. For this, we will use the opencv.cvtColor() function to perform this operation. The opencv.cvtColor() takes the numpy array created in the previous step as its first input argument and a constant cv2.COLOR_RGB2BGR as its second input argument to show that we are converting the RGB format to BGR. After execution, the opencv.cvtColor() returns the final image.
To store the final screenshot, we will use the cv2.imwrite() function. It takes the name of the image file as its first input argument and the array representing the image as its second input argument. After execution of the imwrite() function, the screenshot is saved in the permanent storage.
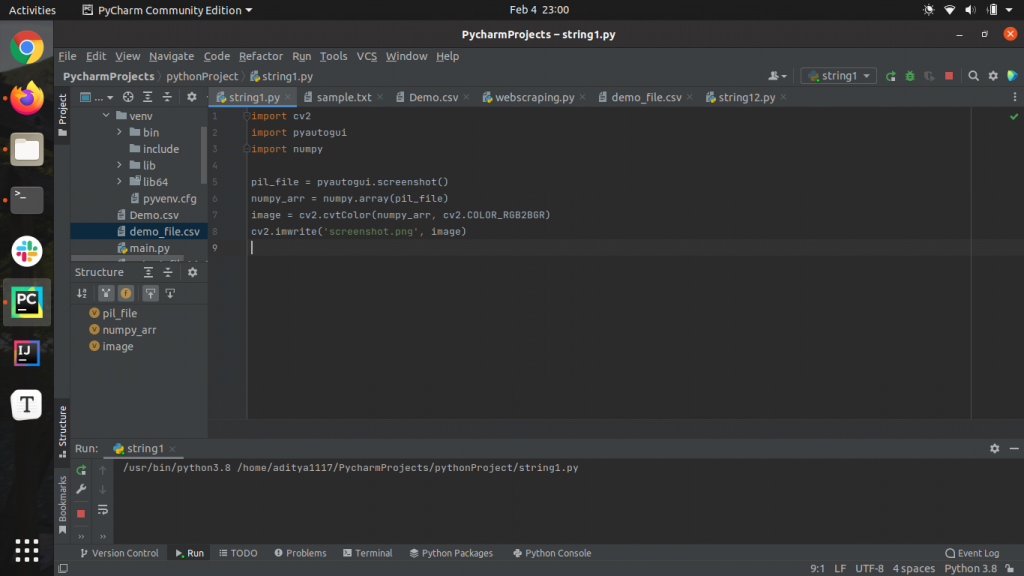
Following is the code to take screenshots in python using the pyautogui and opencv module.
import cv2
import pyautogui
import numpy

pil_file = pyautogui.screenshot()
numpy_arr = numpy.array(pil_file)
image = cv2.cvtColor(numpy_arr, cv2.COLOR_RGB2BGR)
cv2.imwrite('screenshot.png', image)
Output:
Take Screenshots Using the pyscreenshot Module in Python
While taking screenshots with the pyautogui module, we have to perform various operations to produce the output image. To avoid the hassle, we can take screenshots using the pyscreenshot module in Python.
The pyscreenshot module provides us with the grab() function with the help of which can take screenshots. The grab() function, when executed, returns the screenshot in the form of an array. You can store the screenshot in the storage using the save() method defined in the pyscreenshot module. The save() method, when invoked on an array containing the image captured using the grab() function, takes the file name as the input argument and saves the image in the storage.
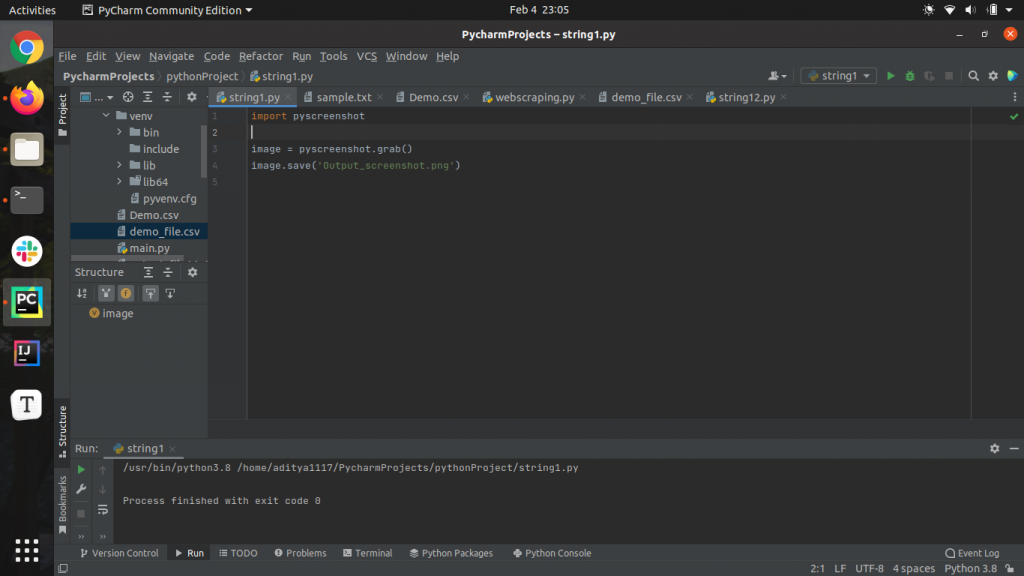
import pyscreenshot

image = pyscreenshot.grab()
image.save('Output_screenshot.png')
Output:
You can also view the screenshot using the show() method defined in the pyscreenshot module. The show() method, when invoked on an array containing the image captured using the grab() function, displays the image on the screen.
Conclusion
In this article, we have discussed two ways to take screenshots in python. To learn more about python programming, you can read this article on list comprehension in python. You might also like this article on set comprehension in python.
Recommended Python Training
Course: Python 3 For Beginners
Over 15 hours of video content with guided instruction for beginners. Learn how to create real world applications and master the basics.