INI and XML files are used to store configuration and system data in software. This article discusses how to convert an INI file to XML format in Python using different approaches.
What is the INI File Format?
The INI file format is a configuration file format used to store settings and configuration information for software applications. It is a plain text file consisting of sections enclosed in square brackets. Each section in an INI file contains key-value pairs that define the data for the corresponding section. The key-value pairs are defined using the format key=value.
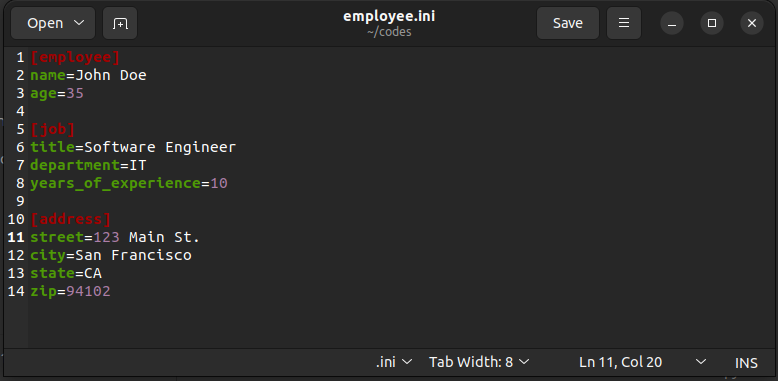
For instance, consider the following example.

[employee]
name=John Doe
age=35

[job]
title=Software Engineer
department=IT
years_of_experience=10

[address]
street=123 Main St.
city=San Francisco
state=CA
zip=94102
In the above INI file, there are three sections i.e. "employee", "job", and "address". Each section contains a set of key-value pairs. Here the keys are the names of the properties and the values are their corresponding values.
- The
"employee"section contains two properties:"name"and"age", which respectively specify the name and age of an employee. "job"section contains information related to the employee’s job, including the"title"of the position, the"department"and the number of"years_of_experience".- The
"address"section contains information related to the employee’s address, such as the street, city, state, and zip code.
What is the XML File Format?
XML (Extensible Markup Language) file format is used to store and transport data in a structured format. It is a plain text file that uses a set of rules to define its structure and contents.
XML documents consist of elements that contain data and other elements. Each element is enclosed in a pair of tags, with the opening tag indicating the element’s start and the closing tag indicating the element’s end.
For example, we can represent the data given in the previous INI file in the XML format as shown below.
<?xml version="1.0" encoding="UTF-8"?>
<data>
  <employee>
    <name>John Doe</name>
    <age>35</age>
  </employee>
  <job>
    <title>Software Engineer</title>
    <department>IT</department>
    <years_of_experience>10</years_of_experience>
  </job>
  <address>
    <street>123 Main St.</street>
    <city>San Francisco</city>
    <state>CA</state>
    <zip>94102</zip>
  </address>
</data>
In the above XML file, the root element is the "data" element. It contains sub-elements such as employee, job, and address. Further, these elements contain other sub-elements to store the data.
The XML format is a widely accepted standard for storing and exchanging structured data. Converting an INI file to XML can make it easier to share the configuration data with other applications and systems that expect XML data. In the next sections, we will discuss how to convert an INI file to XML format using different tools in Python.
Convert INI to XML Using xml.etree Module in Python
XML files have a hierarchical structure. They have a structure like a tree emanating from a single root. On the other hand, INI files have a flat key-value structure.
To convert an INI file to XML in Python using the xml.etree module, we will use the following steps.
- First, we will create an empty
ConfigParserobject using theConfigParser()function defined in the configparser module. - Next, we will read the INI file into the
ConfigParserobject using theread()method. Theread()method, when invoked on aConfigParserobject, takes the file name of the INI file as its input argument. After execution, it loads the data from the INI file into theConfigParserobject. - As the XML data has a tree structure, we will define a root node for converting the INI file to XML format. For this, we will use the
Element()function defined in thexml.etree.ElementTreemodule. TheElement()function takes the name of the element as its input argument and returns the root node for our data. We will name the root node"data". - Now, we will iterate through all the sections and key-value pairs of the
ConfigParserobject. While iteration, we will add the data from theConfigParserobject to the XML tree. For this, we will use theSubElement()function. TheSubElement()function takes the parent node as its first input argument and the name of the sub-element as its second input argument. After execution, it adds the element to the given parent. - While iterating, we will first assign all the sections of the
ConfigParserobject as the sub-elements of the root node"data". Then, we will assign all the key-value pairs of a particular section as the sub-elements of the given section. - After iterating over all the sections and adding the data to the XML tree, we will create the final XML tree using the
ElementTree()function. TheElementTree()function takes the root node as its input argument and returns an XML tree. - Once we get the XML tree, we will save it to a file. For this, we will use the
write()method. Thewrite()method, when invoked on an XML ElementTree, takes the output filename as its first input argument. We can also specify the encoding and whether to use XML declaration string in the output file using theencodingand thexml_declarationparameter. - After execution of the
write()method, we will get the output XML file saved into the file system.
You can use all the above steps to convert an INI file to an XML file in Python. For instance, consider the following ini file.
Let us convert this file to XML using the steps discussed above.
import configparser
import xml.etree.ElementTree as ET

config = configparser.ConfigParser()
config.read('employee.ini')

root = ET.Element('data')
for section in config.sections():
    section_elem = ET.SubElement(root, section)
    for key, value in config.items(section):
        ET.SubElement(section_elem, key).text = value

tree = ET.ElementTree(root)
tree.write('employee.xml', encoding='utf-8', xml_declaration=True)
The output file looks as follows.
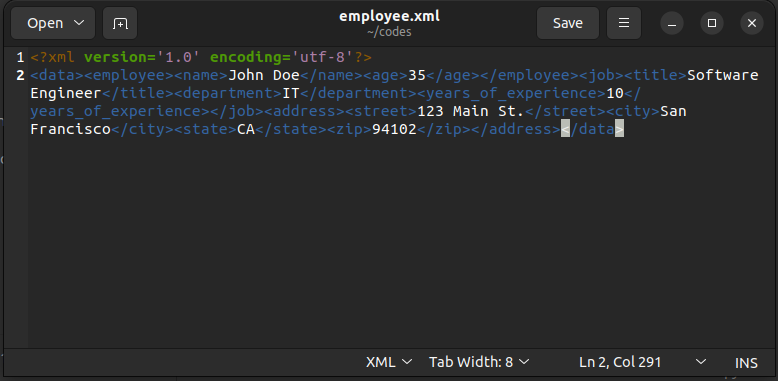
In the above XML file, you can observe that the data from the INI file has been converted to XML.
Convert INI File to XML Using the xmltodict Module in Python
Instead of the Etree module, you can also use the xmltodict module to convert an INI file to an XML file. For instance, you can convert an INI file into an XML string using the following steps.
- First, we will create a
ConfigParserobject and read the INI file into theConfigParserobject. - Next, we will convert the configparser object to a Python dictionary as discussed in this article on how to convert an INI file to a Python dictionary.
- After converting the INI file to a Python dictionary, we will create a new dictionary. In this dictionary, we will create a key
“data”and assign the dictionary created from the INI file as its value. This is important because we need to create a root element for the XML file. In our case,“data”will become the root element. - After creating the above dictionary, we will convert the dictionary into an XML string. For this, we will use the
unparse()method defined in the xmltodict module. Theunparse()method takes the Python dictionary as its input argument and returns the XML string.
You can observe all the steps in the following example.
import configparser
import xmltodict
config_object = configparser.ConfigParser()
config_object.read('employee.ini')
ini_dict=dict()
sections=config_object.sections()
for section in sections:
items=config_object.items(section)
ini_dict[section]=dict(items)
xml_dict = {"data": ini_dict}
xml_string=xmltodict.unparse(xml_dict, pretty=True)
print("The XML output is:")
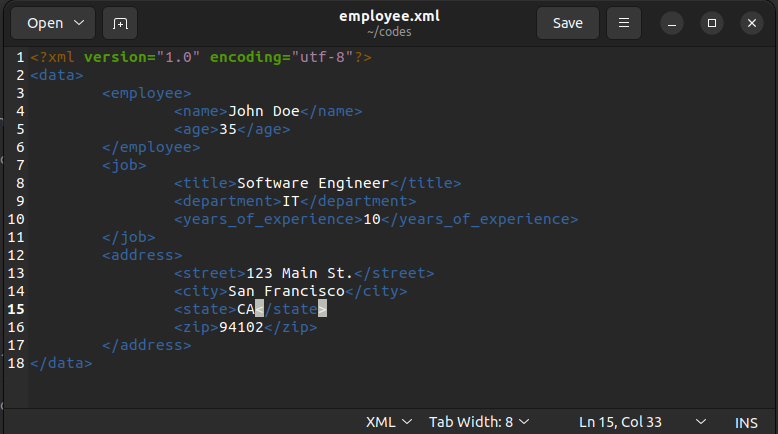
print(xml_string)Output:
The XML output is:
<?xml version="1.0" encoding="utf-8"?>
<data>
	<employee>
		<name>John Doe</name>
		<age>35</age>
	</employee>
	<job>
		<title>Software Engineer</title>
		<department>IT</department>
		<years_of_experience>10</years_of_experience>
	</job>
	<address>
		<street>123 Main St.</street>
		<city>San Francisco</city>
		<state>CA</state>
		<zip>94102</zip>
	</address>
</data>
In the output, you can observe that the INI file has been converted to an XML string with "data" as the root element.
If you want to save the output to an XML file instead of a string, you can use the approach shown in the following code.
import configparser
import xmltodict

config_object = configparser.ConfigParser()
config_object.read('employee.ini')

ini_dict=dict()
sections=config_object.sections()
for section in sections:
    items=config_object.items(section)
    ini_dict[section]=dict(items)
xml_dict = {"data": ini_dict}
xml_file=open("employee.xml","w")
xmltodict.unparse(xml_dict,output=xml_file,pretty=True)
xml_file.close()
In this code, we have opened an XML file in write mode using the open() function after converting the ini file to a Python dictionary. The open() function takes the file name and the Python literal “w” as its input and returns a file pointer after execution.
Next, we used the file pointer to save the output from the unparse() method into the file using the output parameter. When we pass a file pointer as input to the output parameter in the unparse() method, the unparse() method saves the XML data to the file instead of returning a string. The output file looks as follows.
Conclusion
In this article, we discussed how to convert an INI file to XML in Python. To learn more about file conversions, you can read this article on how to convert XML to yaml in Python. You might also like this article on custom JSON decoders in Python.
I hope you enjoyed reading this article. Stau tuned for more informative articles.
Happy Learning!
Recommended Python Training
Course: Python 3 For Beginners
Over 15 hours of video content with guided instruction for beginners. Learn how to create real world applications and master the basics.